Home | Presentazione e Curriculum Vitae | Libri Borri | Abbiamo lavorato per...
| Contatti | Consulenze | Articoli | Software download |
| Personal web site - In English |
Filtri prismatici in Photoshop: come fare? |
|
Prismatic filters in Photoshop: How to? |
|
|
|
|
|
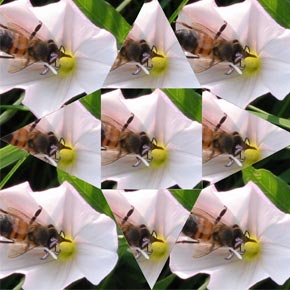
I filtri prismatici, diffusi nella fotografia tradizionale, possono essere riprodotti in Photoshop con apposite "Mappe di spostamento". Ecco come usare quelle che ho reso disponibili sul sito "Adobe Studio Exchange" alla voce "Displacement Maps" (in Photoshop). In caso di problemi nel prelevare le mappe dal sito Adobe Studio Exchange, potete prelevarle anche qui. I link sono posti sotto le anteprima degli effetti. |
Prismatic filters are popular in traditional photography. Their effect can be easily reproduced in Photoshop using appropriate "Displacement Maps" Here some info to properly use the ones I posted on the web site "Adobe Studio Exchange" in the "Displacement Maps" section under "Photoshop". In caso of any problem downloading from the Adobe Studio Exchange web site, the files are also downloadable from here. The links are below the preview images. |
|
L'uso delle mappe di spostamento |
Using the Displacement Maps |
|
|
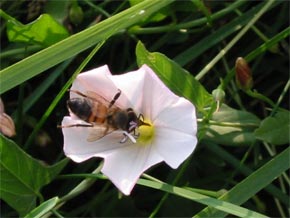
Si inizia con il trasformare l'immagine in un quadrato. Dal menu "Immagine" si sceglie "Dimensioni quadro" e si imposta il lato più corto alla lunghezza di quello più lungo. Se l'immagine originale fosse da 1600 x 1200 pixel si imposteranno i valori a 1600 x 1600 pixel. Ora si sceglierà dal menu "Filtri" alla voce "Distorci" il filtro "Sposta...". Nella finestra che apparirà si imposteranno come valori dello spostamento orizzontale e verticale dei valori compresi generalmente tra 1/3 e 1/4 della misura dell'immagine in pixel. Sono valori indicativi che possono essere variati. Nell'esempio, un valore tra 400 e 550. Dopo avere scelto "OK" Photoshop chiede quale mappa utilizzare; si sceglierà una di quelle qui sotto (dopo averle salvate sul proprio computer e dopo averle decompresse). |
Start transforming the image in a square. From "Image" menu choose "Canvas size" and set the shortest side to the same size of the longest one. For example: if the image size in pixel is 1600 by 1200 the final size should be 1600 by 1600 pixels. Now, from the "Filter" menu at the item "Distort" choose "Displace..." In the dialog shown set the horizontal scale and the vertical scale to a value between 1/3 and 1/4 of the image size (in pixels). This rule is usually fine but values can be changed. In this example should be between 400 and 550. After clicking "OK" Photoshop will ask you to choose a displacement map; you will choose one of those below (after downloading and decompressing them). |
|
|
|
|
|
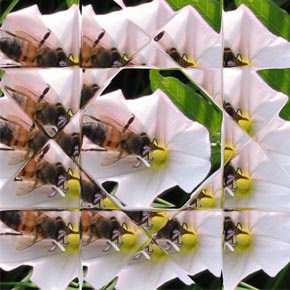
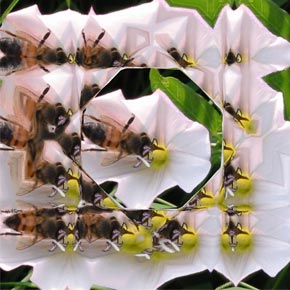
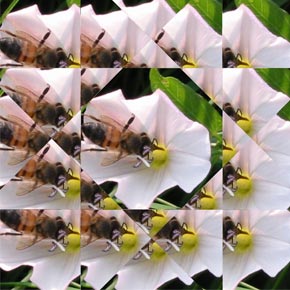
Alcuni esempi
|
||
|
|
|
|
|
|
|
|
|
|
|
|
|
|
|
|
|
|
|
|
|
|
|
|
|
Se desiderate la realizzazione di effetti personalizzati simili a questi, contattatemi. |
If you are interested in the creation of custom effects like this, contact me. |
|