Presentazione | Libri Borri | Abbiamo lavorato per... | Software download
Contatti | Consulenze | Articoli in PDF | Personal web site - In English


PlaceImages PRO 1.0The very helpful utility for Adobe InDesign CS |
||
|
This is the Professional version of PlaceImages (available for download). This version is available upon request. Send me an email (see the address on the left) and I'll be glad to send it to you! Because you will find this program very useful, any donation is higly appreciated. Send me the company info to receive an invoice. |
Questa è la versione professionale di PlaceImages (prelevabile dal sito). Questa versione è disponibile su richiesta. Inviami una eMail (vedi l'indirizzo sulla sinistra) e sarà mia cura inviartelo. Siccome troverai questo programma di sicuro aiuto nel tuo lavoro, ogni donazione è ben accetta! Non dimenticare di inviarmi i tuoi dati per la fatturazione. |
|
|
|
|
|
Main featuresBasically, PlaceImages PRO 1.0 allow to automatically place an image inside a text flow in place of the image name. Additionally PlaceImages PRO 1.0 sets automatically all the images attributes - shadow, borders, corners effects, feather and so on - for the images placed by PlaceImages PRO 1.0. Example: in a block of text of a catalog you need to place the images related to items described. Item XA12345 - Toothbrush By using PlaceImages PRO 1.0 you will be prompted to set the image's parameters (stroke, shadow, maximum size and so on) and to choose the folder containg the images. InDesign and PlaceImages PRO 1.0 will work for you replacing the image's name XA12345.jpg with the corresponding image and setting, automatically, all the possible parameters exactly as you indicated. The same will be done for all the other names of the images. |
Funzioni principaliSostanzialmente PlaceImages PRO 1.0 inserisce automaticamente le immagini in un blocco di testo laddove appare il loro nome. Inoltre, PlaceImages PRO 1.0 imposta autmaticamente tutti i parametri - quali bordo, effetti sugli angoli, ombra, sfumatura - per tutte le immagini inserite da PlaceImages PRO 1.0. Per esempio, in un catalogo si può desiderare di inserire automaticamente le immagini relative agli elementi descritti. Per farlo basterà inserire, al posto dell'immagine, il suo nome: Codice XA12345 - Spazzolino da denti Usando PlaceImages PRO 1.0 verrà chiesto di indicare i parametri dell'immagine (dimensioni, bordo, ombra eccetera) e la cartella che contiene le immagini. |
|
|
|
|
|
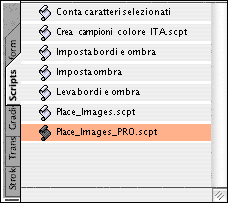
How to use itFirst of all, copy the PlaceImages PRO 1.0 script inside the scripts folder of Adobe InDesign. It's located inside the "Preset" folder available in the InDesign CS folder. The script will be available trough the "Script" palette as visible in the following screenshot.
|
Come utilizzarloInnanzitutto, occorre mettere lo script PlaceImages PRO 1.0 nella cartella "Script" di Adobe InDesign CS. È disponibile nella cartella "Predefiniti" dentro la cartella di InDesign CS. Lo script sarà disponibile nella palette "Script" come visibile nell'immagine seguente.
|
|
|
|
|
|
|
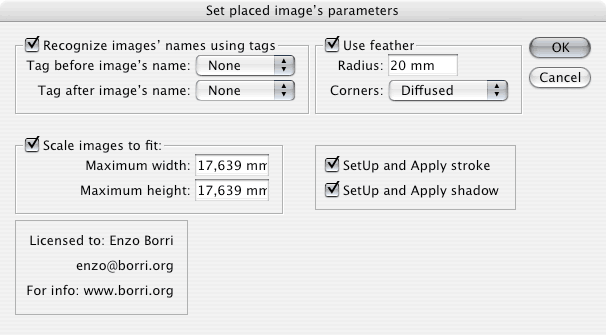
Double clicking the script in the Script palette will start the process and you'll be able to setUp all the possible parameters related to the placed images. |
Con un doppio clic sullo script si avvierà il processo che consentirà di impostare tutti i parametri relativi alle immagini inserite. |
|
|
|
|
|
First dialog – Prima finestra |
||
|
Recognize images' names using tags: Use Feather Scale images to fit SetUp and apply stroke: |
Recognize images' names using tags: Use Feather Scale images to fit SetUp and apply stroke: |
|
|
|
|
|
Stroke Parameters — Parametri del contorno
|
||
|
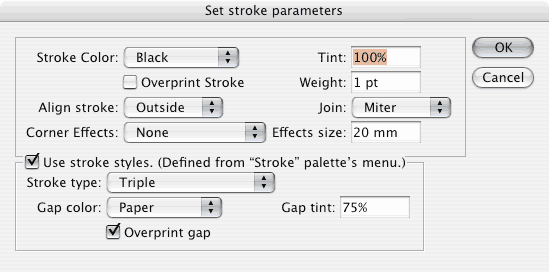
This dialog is shown if in the previous step you selected the checkbox "SetUp and apply Stroke" Here you can set all the possible stroke parameters using the same colors and the same stroke type you defined (if any) in InDesign. As you see, the parameters here are quicker to be setUp than using InDesign palettes! |
Questa finestra appare se in precedenza è stato attivata l'opzione "SetUp and apply Stroke". Qui si possono impostare tutti i possibili parametri del contorno anche utlizzando i colori e gli stili di linea definiti dall'utente in InDesign. Come si vede, i parametri sono più veloci da impostare che in InDesign! |
|
|
|
|
|
Shadow Parameters — Parametri dell'ombra
|
||
|
This dialog is shown if previously you selected the checkbox "SetUp and apply Shadow" Here you can set all the possible shadow parameters using the same colors you defined (if any) in InDesign. |
Questa finestra appare se in precedenza è stato attivata l'opzione "SetUp and apply Shadow". Qui si possono impostare tutti i parametri dell'ombra anche utlizzando i colori definiti dall'utente in InDesign. |
|
|
|
|
|
And now?Now, after setting the parameters you will choose the folder containing your images. You will appreciate PlaceImages PRO 1.0 especially in publications where you need also to apply stroke and shadows. Life is too short to waste precious time in doing manually something that can be done automatically and faster! |
E ora?Ora, dopo avere impostato tutti i valori, si indicherà la cartella contenente le immagini da inserire. Mentre PlaceImages PRO 1.0 e InDesign lavorano, ci si potrà sedere e attendere. Il tempo impiegato aspettando sarà molto molto inferiore a quello occorrente per fare il lavoro manualmente. Si apprezza la comodità di PlaceImages PRO 1.0 soprattutto quando occorre impostare ombre e bordi. La vita è troppo breve per sprecare il tempo nel fare a mano ciò che può essere fatto automaticamente e più in fretta! |
|


